
Welcome to the next tutorial on how to create an application for IPS. In this article we will focus on implement CSS and JavaScript code into our page with resources.
Go back to previews lessons
If you don’t have code from previous tutorial you can download “Source code” form GitHub.
When you download the files then you have to upload folder from GitHub to `applications` folder and install application in AdminCP => System => SITE FEATURES => Applications from “Applications not currently installed” section.

Create CSS file
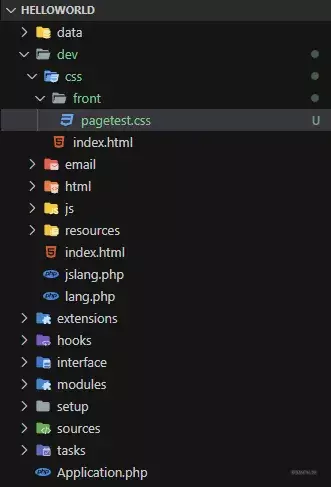
Now our page is dark without any colors. Lets add them! We must create CSS file in our app. Go to files your application and open `dev/css` folder.
We have 3 primary folders here (exactly like HTML from previous tutorial):
- front — Display in front,
- admin — Display in AdminCP,
- global — Display in front and in AdminCP
We can create style for page, `front` folder will be the best for us. Inside “front” folder create simple CSS file. I name it “pagetest.css”.
Let’s make change for our title on page. Create class in CSS and style it in out `pagetest.css`!
.title {
  font-size: 30px;
  font-weight: bold;
  color: red;
}
Import CSS file into controller
In next step we have to import this file into our controller which is responsible for displaying the page. Go to modules/front/helloworld/pagetest.php. In execute method import our CSS file like this:
\IPS\Output::i()->cssFiles = array_merge(\IPS\Output::i()->cssFiles, \IPS\Theme::i()->css(fileName, appName, module));
- filename — your `css` file,
- appName — your appName (app name you can find in each php file by namespace for example `namespace IPS\helloworld`. “helloworld” this is my app name),
- module — front/admin/global folder
Full code here for me:
/**
  * Execute
  *
  * @return void
  */
 public function execute()
 {
  \IPS\Output::i()->cssFiles = array_merge(\IPS\Output::i()->cssFiles, \IPS\Theme::i()->css('pagetest.css', 'helloworld', 'front'));
  parent::execute();
 }
Edit HTML file
Now we can add class into our title (h1). Go to edit HTML page in your files app dev/html/front/pagetest/index.html. Code for me:
<ips:template parameters="" />
<h1 class="title">{lang="hello_world_test_page"}</h1>
Now we can check the result our work.
http://localhost/index.php?app=helloworld&module=helloworld&controller=pagetes
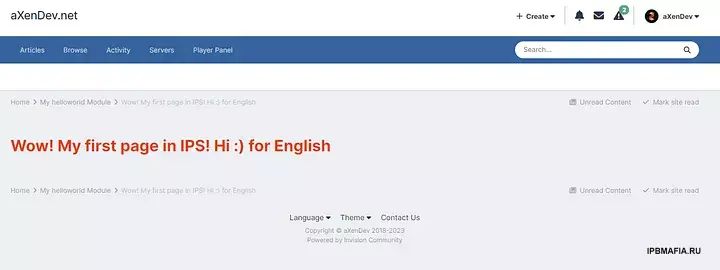
Yey! We have red title on our page!
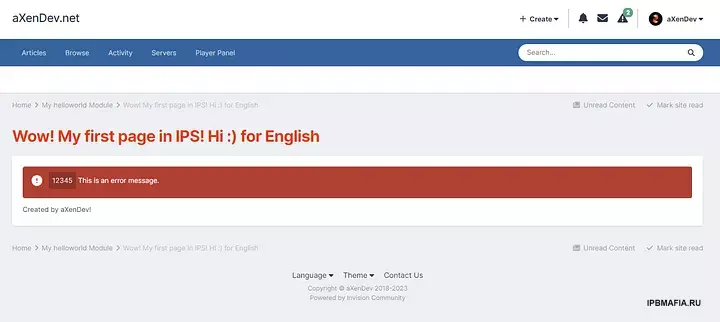
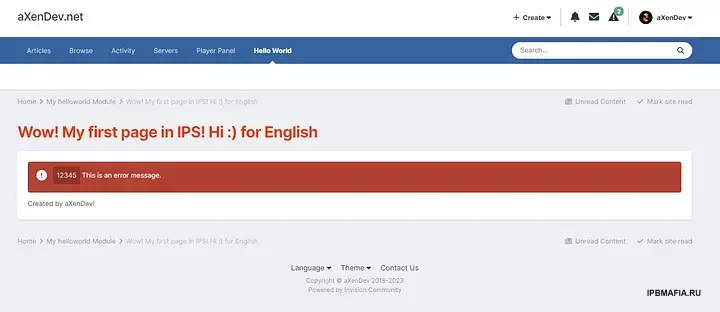
I use IPS CSS framework on page. Full code here for me:
<ips:template parameters="" />
<h1 class="ipsType_pageTitle ipsFlex-flex:11 ipsType_break ipsMargin_bottom title">
  {lang="hello_world_test_page"}
</h1>

<div class='ipsBox ipsPadding'>
  <div class='ipsMessage ipsMessage_error'>
    <span class='ipsMessage_code'>12345</span>
    This is an error message.
  </div>

  Created by aXenDev!
</div>
Result:
Friendly URL Structure
Users doesn’t like URLs with queries and parameters. Now we change it by using Friendly URL Structure.
You have to open `data` folder in your app and create `furl.json` file.
Inside file you can define routing in your app. Show the example:
{
  "topLevel": "helloworld",
  "pages": {
    "helloworld": {
      "friendly": "",
      "real": "app=helloworld&module=helloworld&controller=pagetest"
    }
  }
}
- topLevel — this is our main root in application (You can change the name you want. For example: news),
- pages — define here your pages.
helloworld — this is variable for page, we will using this in the next tutorials,- friendly — friendly URL for us. If you leave empty your URL will be ` http://localhost/ipsdev/helloworld` (or ` http://localhost/ipsdev/index.php?/helloworld/ ` if you not remove index.php in configuration IPS engine)
- real — real URL for our page
You can define more page. Here is the example:
{
  "topLevel": "helloworld",
  "pages": {
    "helloworld": {
      "friendly": "",
      "real": "app=helloworld&module=helloworld&controller=pagetest"
    },
    "test": {
      "friendly": "test",
      "real": "app=helloworld&module=helloworld&controller=test"
    }
  }
}
In this code we have:
- Main URL — http://localhost/ipsdev/helloworld/
- Test URL — http://localhost/ipsdev/helloworld/test/
Bonus: Add page to menu
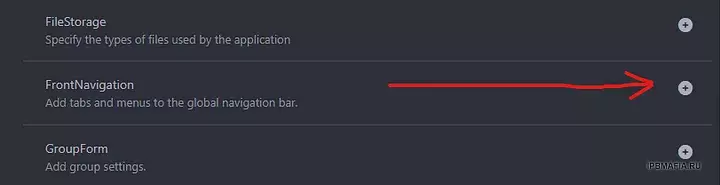
To add page to the menu we have to create extension for our app. Go to AdminCP and go to “Developer Center” our app and open “Extensions” tab.
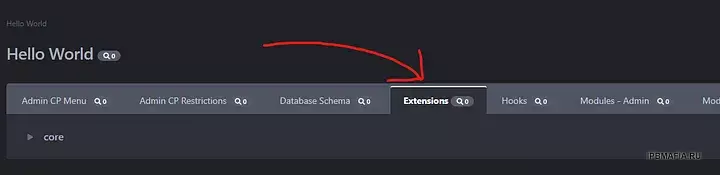
Find “FrontNavigation” extension and click “Create FrontNavigation Extension” button.
Type a classname. I’ll write “helloworld”.
In our core automatically create `helloworld.php` file in `extensions/core /FrontNavigation`. In this file you can menage your page. I change only link method and add lang key into `dev/lang.php`.
/**
  * Get Link
  *
  * @return \IPS\Http\Url
  */
 public function link()
 {
  return \IPS\Http\Url::internal("app=helloworld&module=helloworld&controller=pagetest");
 }
In `dev/lang.php` I’ll add “frontnavigation_helloworld”:
<?php

$lang = [
 …
 "frontnavigation_helloworld" => "Hello World"
];
Now you can add page into your menu. Go to AdminCP => SITE FEATURES => Menu Manager and click “Create Item”. Click to your page and add this!
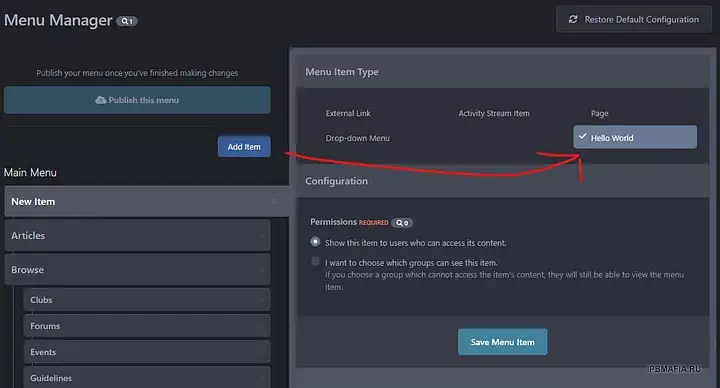
When you added page to menu click “Publish this menu”.
Congrats! You have page form our app in your menu!
Create JavaScript file
You can create also JavaScript file. It’s the same flow like create CSS file. Go to files your application and open `dev/js` folder. You have to create a location folder.
We have 3 primary folders here (exactly like HTML from previous tutorial and CSS):
- front — Display in front,
- admin — Display in AdminCP,
- global — Display in front and in AdminCP
JavaScript file are grouping so we have to create new folder for our group.
From IPS docs:
ЦитатаJavascript files are bundled by location and group, and that forms the filename of the resulting bundle
For example, if we created javascript files in `dev/js/front/controllers/mygroup/somefile.js`, then the bundle name would be front_mygroup.js (location, underscore, groupname), and loaded as follows:
\IPS\Output::i()->jsFiles = array_merge( \IPS\Output::i()->jsFiles, \IPS\Output::i()->js( 'front_mygroup.js', 'app', 'location' ) );For more information you can check here in documentation.
In our app I create`dev/js/front/controllers/pagetest/pagetest.js`.
Inside `pagetest.js`I create code with console log for testing our page.
 console.log('test for pagetest');
Import JavaScript file into controller
Now we have to import JavaScript file to our controller. Go to `modules/front/helloworld/pagetest.php` In execute method import our JavaScript file like this:
\IPS\Output::i()->jsFiles = array_merge(\IPS\Output::i()->jsFiles, \IPS\Output::i()->js('front_pagetest.js', 'helloworld', 'front'));Now check our page http://localhost/ipsdev/helloworld/ and open console in the browser (F12).
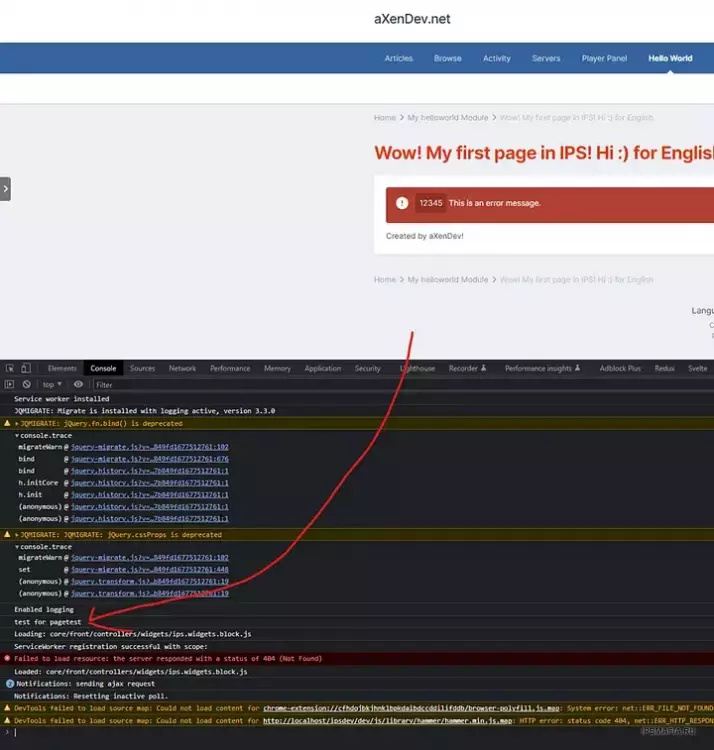
It’s working! You can create JavaScript code whatever you want.
Images and Other Resources
You can upload images and other resources to your app. In this tutorial I upload logo into our app. Go to `dev/resources`. You have to create a location folder.
We have 3 primary folders here (exactly like HTML from previous tutorial and CSS, JavaScript):
- front — Display in front,
- admin — Display in AdminCP,
- global — Display in front and in AdminCP
Now put your file into module folder. For example into front folder.

Now we can put image into HTML file. Go to `dev/html/front/index.phtml` and add image into `img` tag.
<img src='{resource="logo_dark.png" app="helloworld" location="front"}' alt='Logo aXenDev'>Full code:
<ips:template parameters="" />
<h1 class="ipsType_pageTitle ipsFlex-flex:11 ipsType_break ipsMargin_bottom title">
  {lang="hello_world_test_page"}
</h1>

<div class='ipsBox ipsPadding'>
  <div class='ipsMessage ipsMessage_error'>
    <span class='ipsMessage_code'>12345</span>
    This is an error message.
  </div>

  <img src='{resource="logo_dark.png" app="helloworld" location="front"}' alt='Logo aXenDev'>

  Created by aXenDev!
</div>
Now check our page http://localhost/ipsdev/helloworld/.
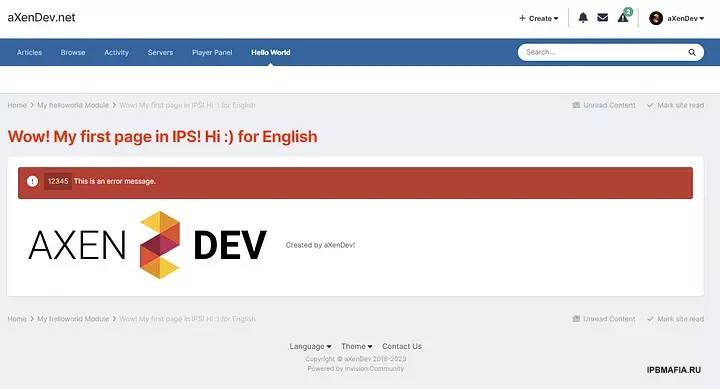
Congratulations! You have a image in your app!
If you want to read more about resources you can check the documentation.
Credit to Maciej Piotr Balcerzak


Рекомендуемые комментарии
Комментариев нет
Присоединяйтесь к обсуждению
Вы можете написать сейчас и зарегистрироваться позже. Если у вас есть аккаунт, авторизуйтесь, чтобы опубликовать от имени своего аккаунта.
Примечание: Ваш пост будет проверен модератором, прежде чем станет видимым.