
Welcome to the first tutorial on creating custom apps for the IPS (Invision Community) engine. This series will focus on create apps and plugins.
What is it the Invision Community?
It is a CMS for advanced forums but it offers applications such as commerce, pages, files, gallery, events, calendar. To create a modification for this engine, a license is required, which can be purchased on the official website. You can test it for free 30-day trial.
How install IPS?
Installation is very easy, like the WordPress CMS ![]() You have to download packages form Client Area and follow this guide. If you want install IPS engine on your local machine use test install key and use XAMPP app (I recommended for Mac OS) or Laragon app (I recommended for Windows).
You have to download packages form Client Area and follow this guide. If you want install IPS engine on your local machine use test install key and use XAMPP app (I recommended for Mac OS) or Laragon app (I recommended for Windows).
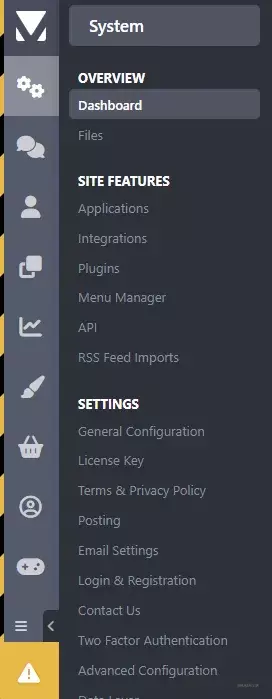
Enable Developer Mode
Before we start creating an application, we need to turn on the developer mode.
Remember not to run developer mode in production! Your community can be run much slower than usual and may introduce security vulnerabilities!
First download Developer Tools for your IPS version.
You can check IPS version by move in AdminCP => System => Support => Get Support.
Extract the developer tools and move them to where IPS Community Suite is installed, merging with the existing files.
Create or modify constants.php file and paste:
<?php
define( 'IN_DEV', TRUE );
Your AdminCP should change. In the lower left corner, we should receive information that we are in developer mode.
Create first app
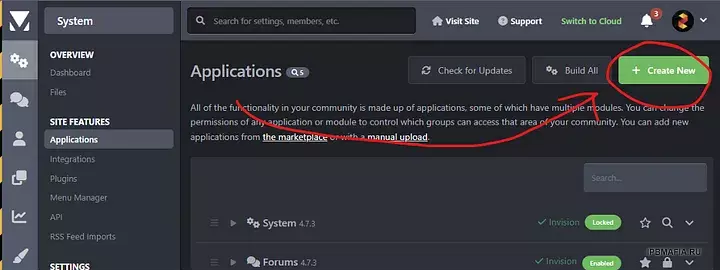
Go to AdminCP => System => Applications and click “Create New”.
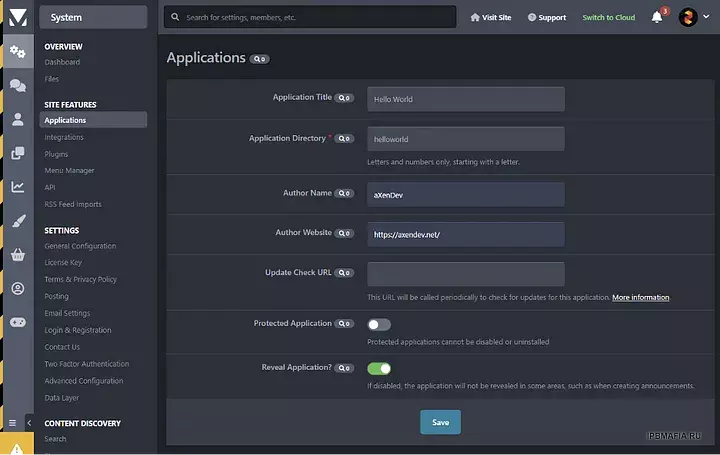
Type name of app, application directory (name folder).
Remember: Application Directory must be unique to each installation! You can add come prefix for you app for example (for me) `aXenHelloWorld`.
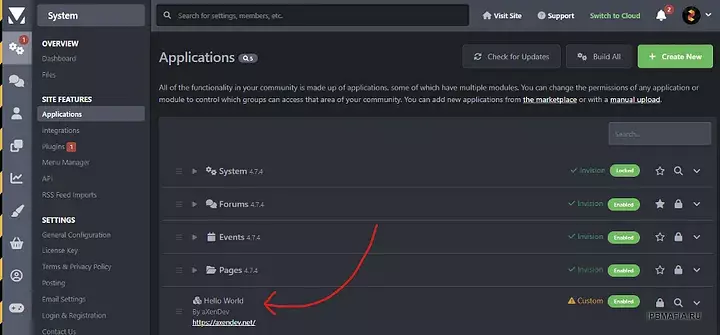
Congratulations! You are created first application in IPS!
At the moment, your application does absolutely nothing. Let’s create a new website for your community.
In your files you have folder `applications` and inside this folder you have your application. For me this is `helloworld` folder. Open your folder with the application via PHPStorm (paid) or VSCode (free). I using VSCode.
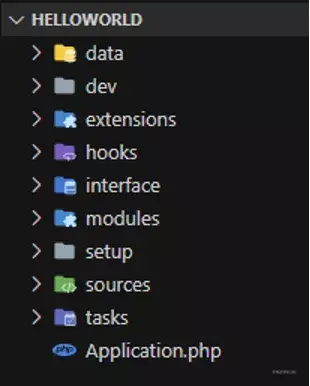
Now take to look for directory structure. You can explore folders, but remember, `data` folder is generate automatically, so you can’t modify files here (with the exception of furl.json).
Create page
Okey, let’s create first page in your application.
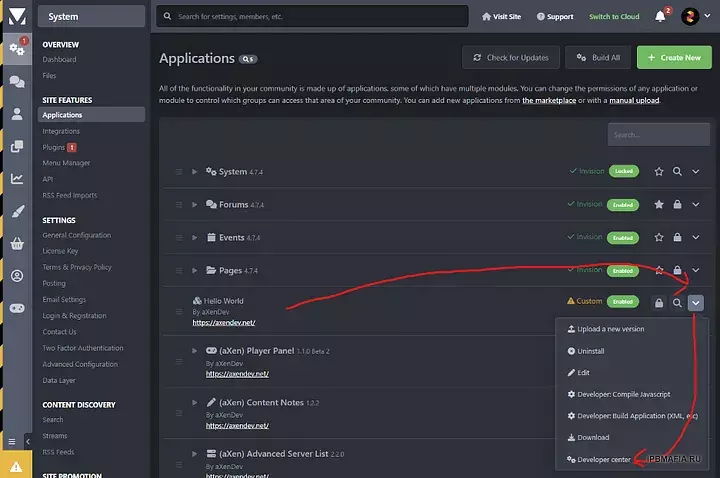
Go to AdminCP => System => Side Features => Applications. Find your application and open ”Developer center”.
Create module
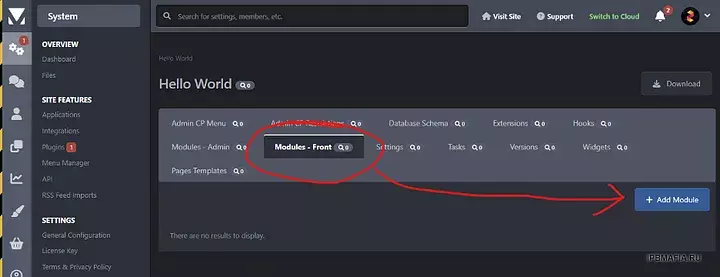
Go to “Modules — Front” tab. Modules are our main classes, which can be said to serve as folders. Defines modules and controllers used on the front end of your application. Files and folders will be generated in your modules/front directory.
Now let’s create new module, click “Add Module” button and provide “Module Key”. I’ll type `helloworld`.
Create controller
In next steep we’re create controller for our first page. Find “Plus” button, click it and provide filename. I’ll type `pagetest`.
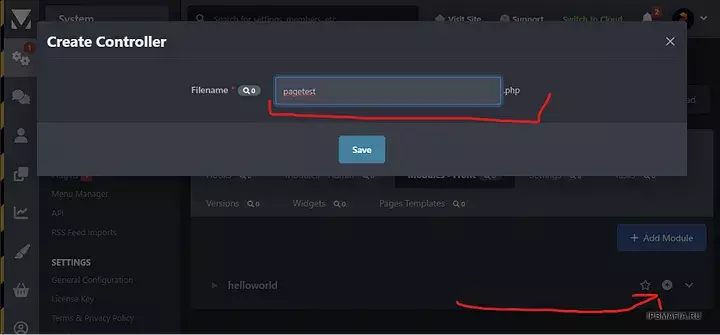
Now check files in your applications. We created a module called `helloworld` and a controller called `pagetest.php`.
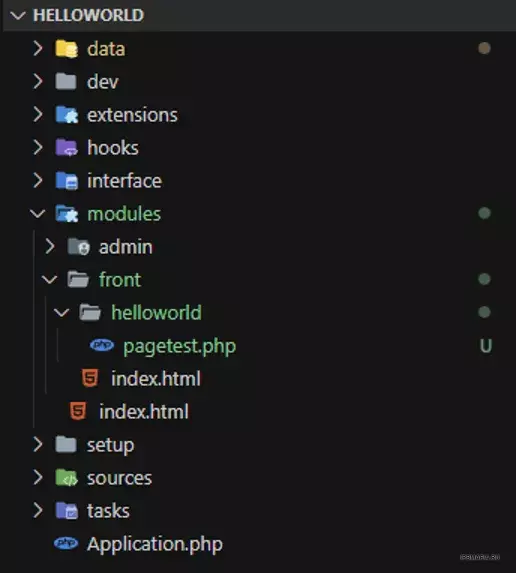
Open “pagetest.php” file. IPS automatically generated us the basic structure of the file. Don’t change it, except for the methods that are inside the class.
Methods build-in:
- Execute — code running only once when render other functions,
- Manage — main function for your controller
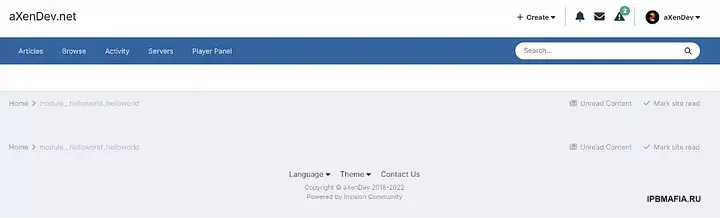
Congratulations! You are create first page!
Now you can go to your page with the appropriate query:
Цитата
Create HTML template
Our page is empty. We must create HTML page to display something here. Go to files your application and open `dev/html` folder.
We have 3 primary folders here:
- front — Display in front,
- admin — Display in AdminCP,
- global — Display in front and in AdminCP
For our app create new folder “front”.
Inside “front” folder create new folder (for group) for example “pagetest” and inside folder create “index.phtml”. The file and folder names are optional.
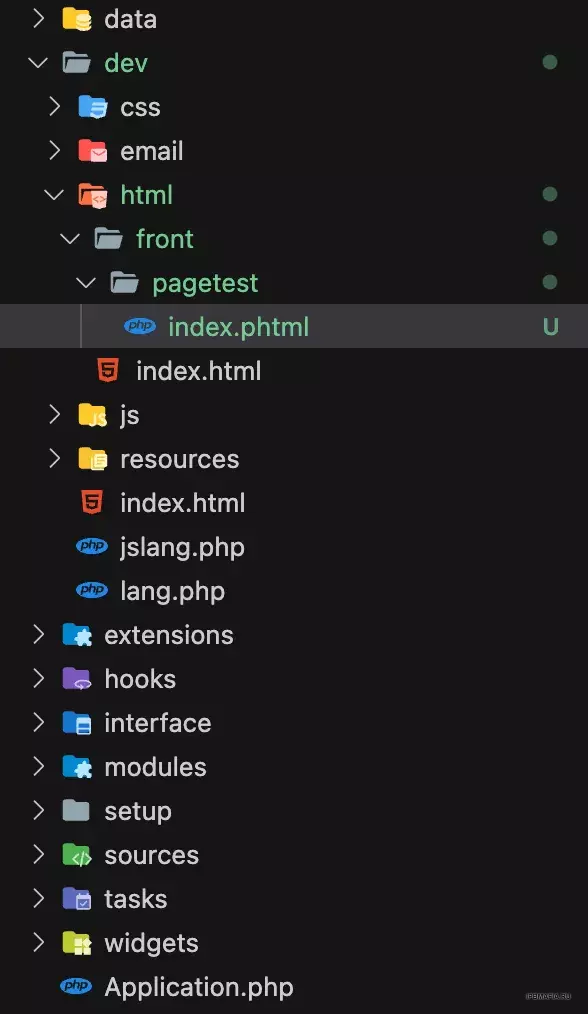
Inside “index.phtml” on top file you must write header. Add in file (on the top):
<ips:template parameters="" />
Below you can write your HTML. Example:
<ips:template parameters="" />
<h1>Wow! My first page in IPS! Hi :)</h1>
In the next step, we will render this HTML code in our controller. Inside controller (for me pagetest.php) modify manage method.
\IPS\Output::i()->output = \IPS\Theme::i()->getTemplate(group, appName, module)->filename();
- module — front/admin/global folder,
- group — Name folder in module folder,
- appName — your appName (app name you can find in each php file by namespace for example `namespace IPS\helloworld`. “helloworld” this is my app name),
- filename — your `phtml` file
Full code here for me:
protected function manage()
{
  \IPS\Output::i()->output = \IPS\Theme::i()->getTemplate('pagetest', 'helloworld', 'front')->index();
}
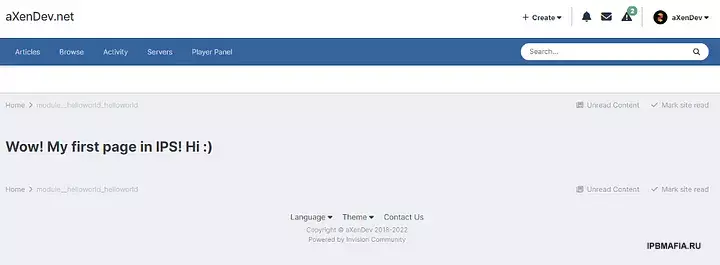
Now we have text inside page!
Language string
IPS has language module for strings. Let’s add few strings. Go to your files app and open file in “dev/ lang.php”. Next add some strings.
<?php

$lang = [
 '__app_helloworld' => "Hello World",
 'module__helloworld_helloworld' => "My helloworld Module",
 'hello_world_test_page' => "Wow! My first page in IPS! Hi :) for English"
];
“module__helloworld_helloworld” is for your module in breadcrumb.
Now go back to our `index.phtml` file. Replace content to and save file:
<ips:template parameters=”” />
<h1>{lang="hello_world_test_page"}</h1>
Now your application use “hello_world_test_page” key to display string “Wow! My first page in IPS! Hi ![]() for English”.
for English”.

Breadcrumbs
You can create your own breadcrumb for page. Go to your controller and modify manage method.
\IPS\Output::i()->breadcrumb[] = [null, \IPS\Member::loggedIn()->language()->addToStack('hello_world_test_page')];
This line accept array with 2 parameters:
- URL — current null if is current page,
- String — to display text
This is method language module build-in IPS. “‘hello_world_test_page” is your language key.
\IPS\Member::loggedIn()->language()->addToStack('hello_world_test_page');php
Check the results:
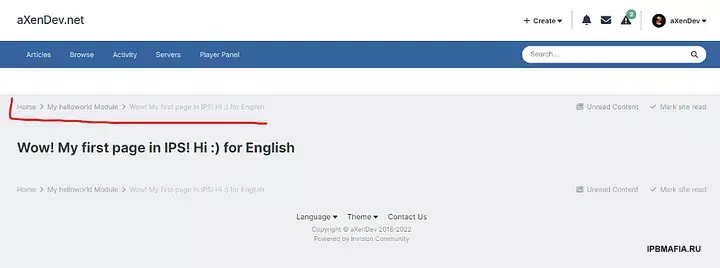
Title Page
We don’t have current title page. Check browser tab for current page in your IPS.

If we want to add some text here, we can do that by modify manage method in your controller.
\IPS\Output::i()->title = \IPS\Member::loggedIn()->language()->addToStack('hello_world_test_page');
Check the results:

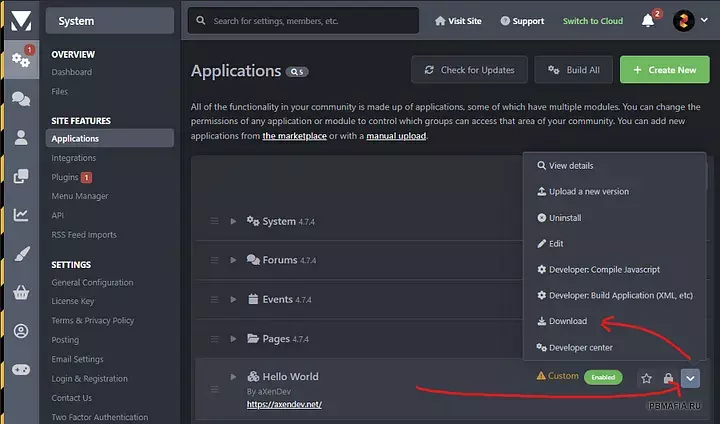
Export Application
Now you can build application for your production community. Go to AdminCP => System => Side Features => Applications. Find your application and click “Download” button.
Choose new version and click “Save”.
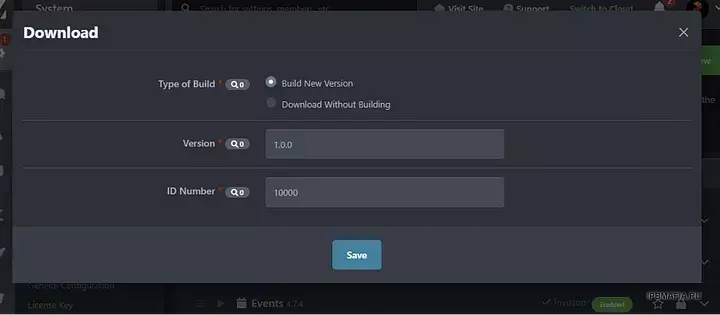
Done! Now you have `.tar` version of your application.
Ending
Congratulations! You’re created first application in IPS engine. If you are lost, look at the source code on my GitHub.
Credit to Maciej Piotr Balcerzak

Recommended Comments
Join the conversation
You can post now and register later. If you have an account, sign in now to post with your account.
Note: Your post will require moderator approval before it will be visible.