
MrHaim
-
Регистрация
-
В сети
Posts posted by MrHaim
-
-
Hi. In this short tutorial, I will describe how to set the default font name and size (and optionally color) in CKEditor on IPS Community Suite.
To set the default font, log in to ACP and go to the Appearance tab, then Themes.
Edit the HTML and CSS of your theme and paste the following JS before the closing </body> tag.
<script>
	if(typeof CKEDITOR !='undefined'){
		CKEDITOR.addCss(".cke_editable{cursor:text; font-size: 20px; font-family: Georgia; color:#27ae60 !important}");
		CKEDITOR.config.font_defaultLabel='Georgia';
		CKEDITOR.config.fontSize_defaultLabel='20px';
	}
</script>
After applying the above code, the default font in CKEditor will be Georgia, with a size of 20 pixels, colored red.
To remove text coloring, remove the color:#27ae60 value from the above code.
The original content of the guide:
https://invisioncommunity.com/forums/topic/471001-default-font-and-text-size/
Привет. В этом кратком руководстве я опишу, как установить имя и размер шрифта по умолчанию (и, возможно, цвет) в CKEditor в IPS Community Suite.
Чтобы установить шрифт по умолчанию, войдите в ACP и перейдите на вкладку «Внешний вид», затем «Темы».
Отредактируйте HTML и CSS своей темы и вставьте следующий код JS перед закрывающим тегом </body>.
<script>
	if(typeof CKEDITOR !='undefined'){
		CKEDITOR.addCss(".cke_editable{cursor:text; font-size: 20px; font-family: Georgia; color:#27ae60 !important}");
		CKEDITOR.config.font_defaultLabel='Georgia';
		CKEDITOR.config.fontSize_defaultLabel='20px';
	}
</script>
После применения приведенного выше кода шрифтом по умолчанию в CKEditor будет шрифт Georgia размером 20 пикселей красного цвета.
Чтобы убрать цвет текста, удалите значение color:#27ae60 из приведенного выше кода.
Оригинальное содержание руководства:
https://invisioncommunity.com/forums/topic/471001-default-font-and-text-size/
-
Запрос на добавление дополнительных категорий в загрузки
такой же как
Ресурсы для веб-мастеровПоддержка и загрузка других систем форума, таких как VB и т. д.
Поддержка и загрузки WordPress
Поддержка и загрузки для систем CMS и т. д. -
-
-
-
Lyrics
This resource will allow to submit music lyrics and display them in a nice format.
Features:Internal search by lyric title and content, artist, lyric writer and year released.
Fully compatible with IPS 4.6 (Clubs, Recommended Comments, Content Message, etc.)
Per-category features:
Unlimited depth of parent-child relationships
Background image to be displayed in index
Icons
Ability to use comments/reviews, tags, share, anonymous content, etc.
Discussion topics
Permission to show category, read articles, submit articles, add comments, and avoid approval queues
Extra Fields that can be used per-category
Integration with the suite:
Report system, search, report, webhooks, achievements, reputation points, etc.
Ability to add a Youtube embed video URL
Ability to create RSS feeds of lyrics
etc
Этот ресурс позволит отправлять тексты песен и отображать их в удобном формате.
Функции:
Внутренний поиск по названию и содержанию лирики, исполнителю, автору лирики и году выпуска.
Полностью совместим с IPS 4.6 (клубы, рекомендуемые комментарии, сообщения о содержании и т. д.)
Характеристики по категориям:
Неограниченная глубина отношений родитель-ребенок
Фоновое изображение для отображения в индексе
Иконки
Возможность использовать комментарии/отзывы, теги, делиться, анонимный контент и т. д.
Темы для обсуждения
Разрешение показывать категории, читать статьи, отправлять статьи, добавлять комментарии и избегать очередей утверждения
Дополнительные поля, которые можно использовать для каждой категории
Интеграция с пакетом:
Система отчетов, поиск, отчет, вебхуки, достижения, очки репутации и т. д.
Возможность добавить URL видео для встраивания Youtube
Возможность создавать RSS-каналы текстов песен
и т. д.
-
Добавил
-
Добавлено04/27/23
-
Категория
-
ЯзыкENGLISH
-
-
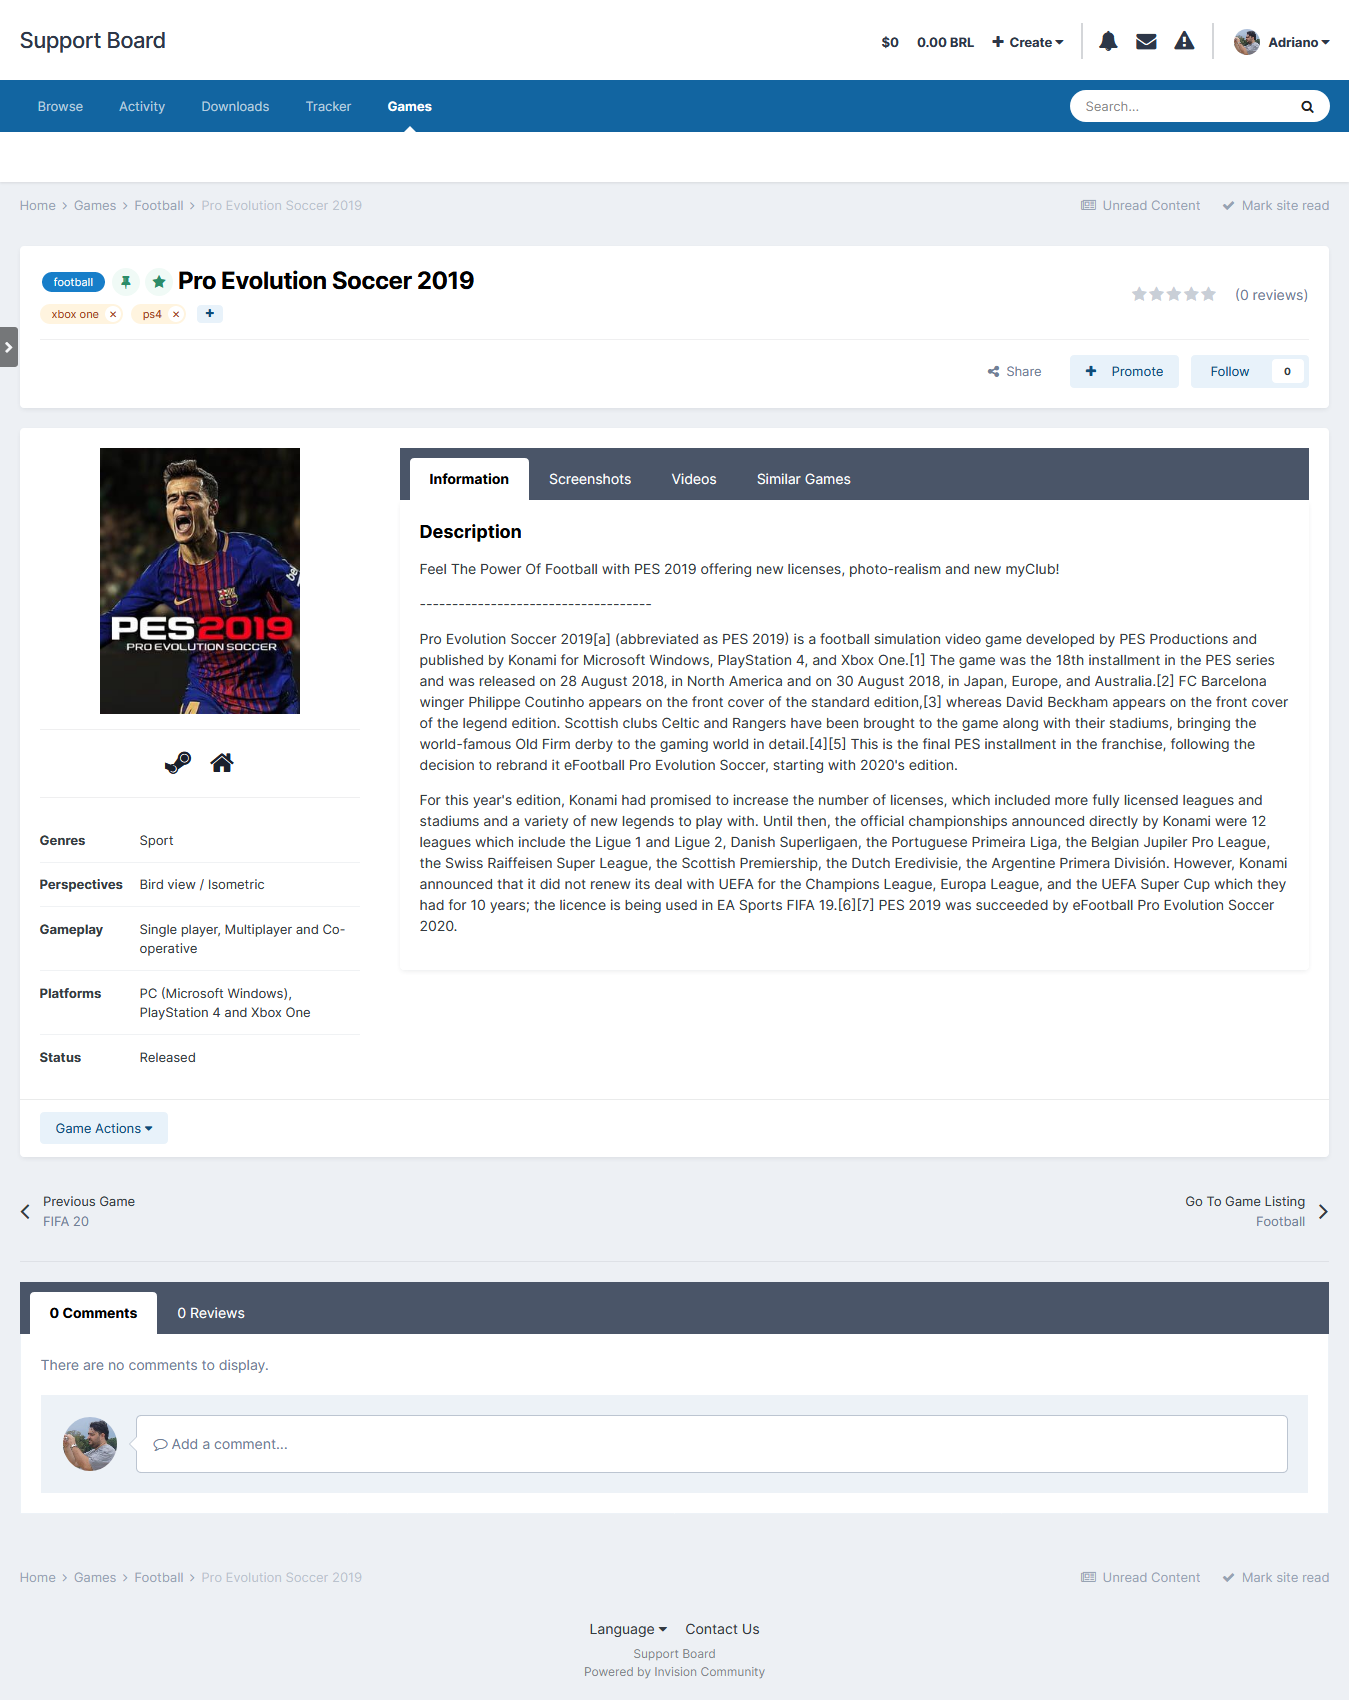
Games
This resource uses IGDB API to grab data from games to your site.
All you have to do is type a word from the game title and then a list of matches will show up. From now on, with just a click, you will have in the submission form:
Title
Storyline, if available
Description
Status
Genres
Themes
Websites
Modes
Multiplayer modes
Platforms
Player perspectives
Videos
Similar games
Tabs:
You will also have tabs to display:
Game Information
Screenshots
Videos
Similar Games
All the tabs, except Information (the main one with the game description), can be disabled via setting.
IGDB API Key:
In order to use our API, you must have a Twitch Account.
The IGDB.com API is free for non-commercial usage under the terms of the Twitch Developer Service Agreement.
Sign Up with Twitch for a free account
Ensure you have Two Factor Authentication enabled
Register your application
Manage your newly created application
Generate a Client Secret by pressing [New Secret]
Take note of the Client ID and Client Secret
Enter the Client ID and Client Secret in this app settings on Admin CP
Other features:
Fully integrated to the framework: Rest API, categories, extra fields, notifications, search, tags, follow, reactions, promote, etc.
Settings:
Settings to control the app behaviour in several places/situations.
Этот ресурс использует IGDB API для захвата данных из игр на ваш сайт.
Все, что вам нужно сделать, это ввести слово из названия игры, после чего появится список совпадений. Отныне одним кликом вы будете иметь в форме отправки:
Заголовок
Сюжет, если есть
Описание
Положение дел
Жанры
Темы
Веб-сайты
Режимы
Многопользовательские режимы
Платформы
Перспективы игрока
Видео
Похожие игры
Вкладки:У вас также будут вкладки для отображения:
Информация об игре
Скриншоты
Видео
Похожие игры
Все вкладки, кроме Информация (главная с описанием игры), можно отключить через настройки.Ключ API IGDB:
Чтобы использовать наш API, у вас должна быть учетная запись Twitch.
API IGDB.com является бесплатным для некоммерческого использования в соответствии с условиями Соглашения об обслуживании разработчиков Twitch.
Зарегистрируйтесь на Twitch, чтобы получить бесплатную учетную запись
Убедитесь, что у вас включена двухфакторная аутентификация
Зарегистрируйте свое приложение
Управляйте только что созданным приложением
Создайте секрет клиента, нажав [Новый секрет]
Обратите внимание на идентификатор клиента и секрет клиента.
Введите идентификатор клиента и секрет клиента в настройках этого приложения на панели администратора.
Другие особенности:Полностью интегрирован в фреймворк: Rest API, категории, дополнительные поля, уведомления, поиск, теги, подписки, реакции, продвижение и т. д.
Настройки:Настройки для управления поведением приложения в нескольких местах/ситуациях.
-
Добавил
-
Добавлено04/27/23
-
Категория
-
ЯзыкENGLISH
-
-
-
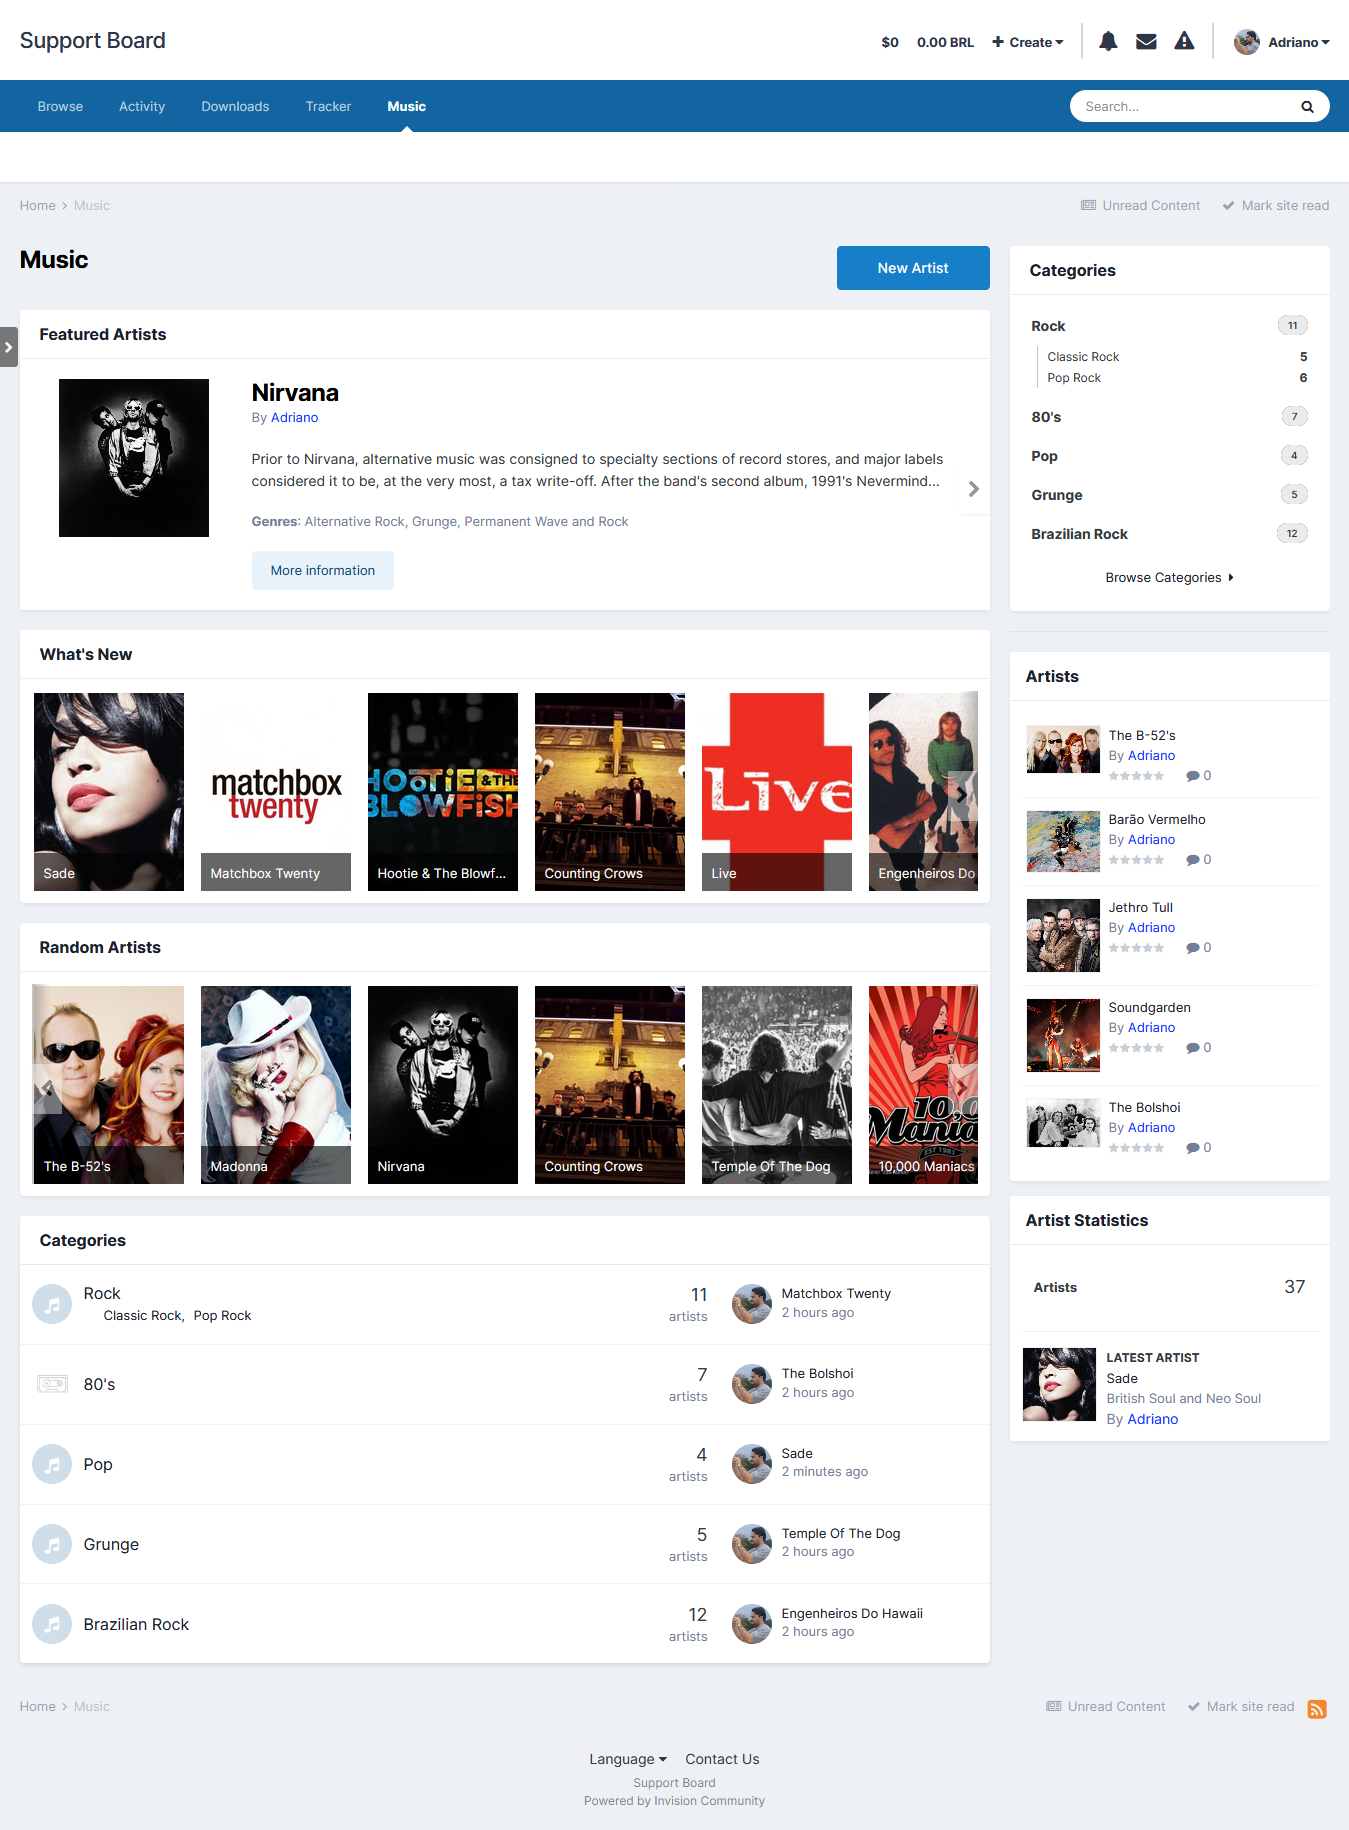
Music
This resource uses Spotify API to grab data from artists to your site.
NOTE: SPOTIFY DOES NOT PROVIDE ARTIST BIOGRAPHY, MONTHLY LISTENERS, PHOTOS AND PLAYLISTS IN THEIR API ENDPOINTS ANYMORE. YOU WILL HAVE TO GET THE BIOGRAPHY
ELSEWHERE (Google, Wikipedia, official site, etc.) AND PASTE IT IN THE EDITOR.
All you have to do is type a word from the artist name and then a list of matches will show up. From now on, with just a click, you will have after submit the form:Name
Photo
Biography
Photo
Global Chart Position
Montly Listeners
Playlists
Followers
Popularity
Genres
Spotify link
Social Media links (Twitter, Facebook and Instagram) if availabe
Tabs:
You will also have tabs to display:Photos from the artist in a grouped lightbox
Albums (linked to Spotify)
Playlists (linked to Spotify)
Popular Releases (linked to Spotify)
Montly Listeners
Related Artists
All the tabs, except Biography, are ajaxed loaded and represents the current state of the artist on Spotify
Other features:Fully integrated to the framework: Rest API, categories, extra fields, notifications, search, tags, follow, reactions, promote, etc.
Settings:
Settings to control the app behaviour in several places/situations.
-
Добавил
-
Добавлено04/25/23
-
Категория
-
ЯзыкENGLISH
-
-
-
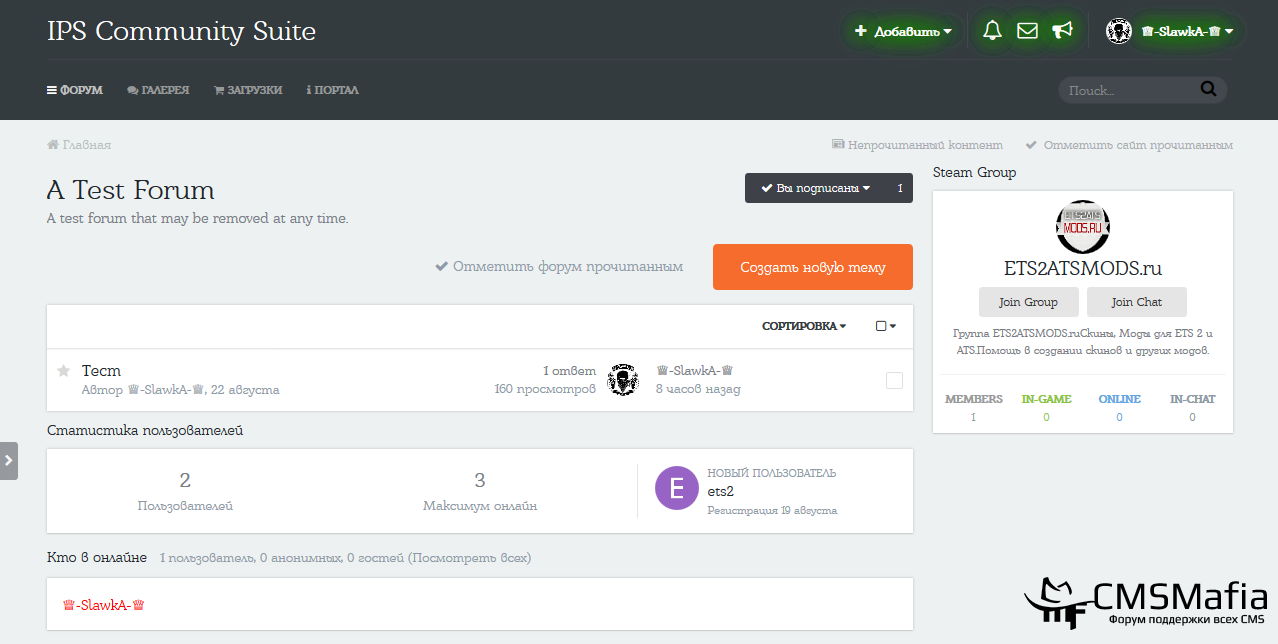
(GS) Steam Group
Плагин отображает информацию о указанной группе Steam в качестве виджета.
У меня работает на 4.1 отлично, как и на версии 4.2.
Есть версия 2.1.0
Но это то, что мне удалось найти.The plugin displays information about the specified Steam group as a widget.
It works fine for me on 4.1, as well as on version 4.2.
There is version 2.1.0
But this is what I was able to find.
-
Добавил
-
Добавлено04/25/23
-
Категория
-
ЯзыкENGLISH
-
-
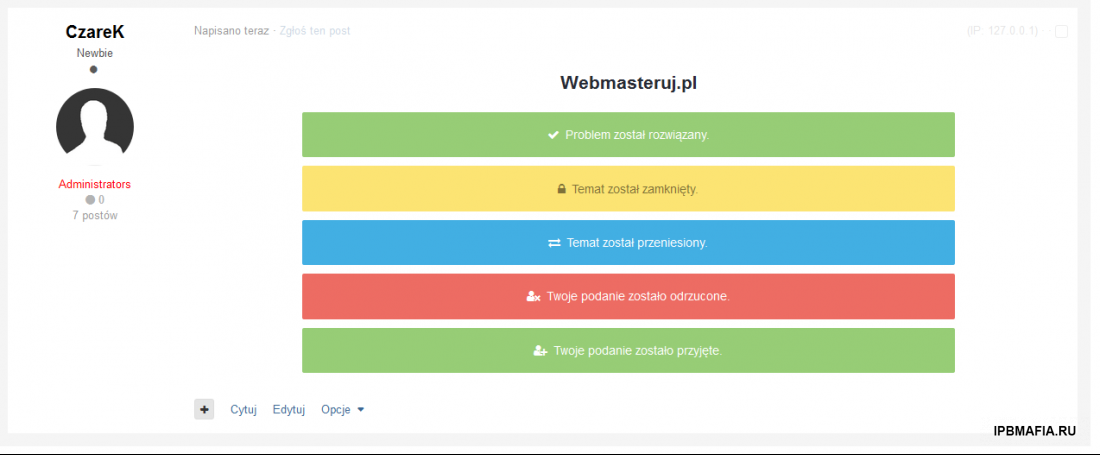
A guide showing how to use moderator templates in IPS Community Suite 4. (Invision Community). So how can I insert "plates" into a post.
First, go to: ACP --> Appearance --> Styles and Templates --> Edit HTML and CSS --> CSS custom tab --> custom.css
Paste the code below:
/* Domyślne ustawienia */
.webMessage {
    border-radius: 2px;
    color: #fff;
   	margin: 10px auto;
  	text-align: center;
    padding: 15px;
  	width: 75%;
}
/* Problem został rozwiązany */
.webMessage_success {
    background-color: #97cd76;
}
.webMessage_success:before {
	 content: "\f00c";
  	 font-family: 'FontAwesome';
  	 margin-right: 3px;
}
/* Temat został zamknięty */
.webMessage_closed {
    background-color: #fce473;
  	color: rgba(0, 0, 0, 0.5);
}
.webMessage_closed:before {
	 content: "\f023";
  	 font-family: 'FontAwesome';
  	 margin-right: 3px;
}
/* Temat został przeniesiony */
.webMessage_move {
    background-color: #42afe3;
}
.webMessage_move:before {
	 content: "\f0ec";
  	 font-family: 'FontAwesome';
  	 margin-right: 3px;
}
/* Twoje podanie zostało przyjęte */
.webMessage_ok {
    background-color: #97cd76;
}
.webMessage_ok:before {
	 content: "\f234";
  	 font-family: 'FontAwesome';
  	 margin-right: 3px;
}
/* Twoje podanie zostało odrzucone */
.webMessage_red {
    background-color: #ed6c63;
}
.webMessage_red:before {
	 content: "\f235";
  	 font-family: 'FontAwesome';
  	 margin-right: 3px;
}
Click Save.

Then go to: ACP --> Forum --> Moderation templates --> Add new item:
In the "Template name" field, enter, for example, Problem solved.
Active in forums --> All
Options Open/Close --> Close
Reply --> Add Reply
Click "Document Source" and paste the HTML code:
<div class="webMessage webMessage_success">
	Problem został rozwiązany.
</div>
We click the Save button.
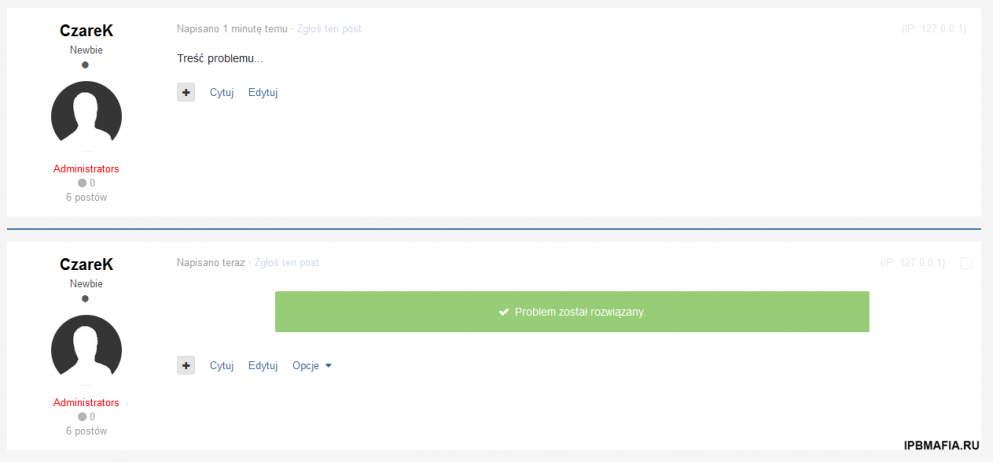
Go to the selected topic and click "Moderate". From the list, select "The problem has been solved".
After clicking "Problem solved" the topic will be closed and our information plaque will be added.
Sample HTML code:
<div class="webMessage webMessage_success">
	Problem został rozwiązany.
</div>
<div class="webMessage webMessage_closed">
	Temat został zamknięty.
</div>
<div class="webMessage webMessage_move">
	Temat został przeniesiony.
</div>
<div class="webMessage webMessage_red">
	Twoje podanie zostało odrzucone.
</div>
<div class="webMessage webMessage_ok">
	Twoje podanie zostało przyjęte.
</div>
Preview:
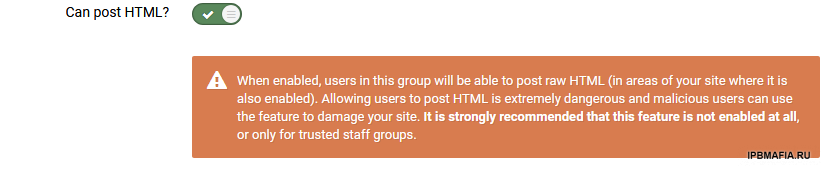
I will only add that you need to select the "Can post HTML?" Yes.
Russian
Руководство, показывающее, как использовать шаблоны модераторов в IPS Community Suite 4. (Invision Community). Так как же мне вставить "тарелки" в пост.
Сначала перейдите в: ACP --> Внешний вид --> Стили и шаблоны --> Редактировать HTML и CSS --> Пользовательская вкладка CSS --> custom.css
Вставьте код ниже:
/* Domyślne ustawienia */
.webMessage {
    border-radius: 2px;
    color: #fff;
   	margin: 10px auto;
  	text-align: center;
    padding: 15px;
  	width: 75%;
}
/* Problem został rozwiązany */
.webMessage_success {
    background-color: #97cd76;
}
.webMessage_success:before {
	 content: "\f00c";
  	 font-family: 'FontAwesome';
  	 margin-right: 3px;
}
/* Temat został zamknięty */
.webMessage_closed {
    background-color: #fce473;
  	color: rgba(0, 0, 0, 0.5);
}
.webMessage_closed:before {
	 content: "\f023";
  	 font-family: 'FontAwesome';
  	 margin-right: 3px;
}
/* Temat został przeniesiony */
.webMessage_move {
    background-color: #42afe3;
}
.webMessage_move:before {
	 content: "\f0ec";
  	 font-family: 'FontAwesome';
  	 margin-right: 3px;
}
/* Twoje podanie zostało przyjęte */
.webMessage_ok {
    background-color: #97cd76;
}
.webMessage_ok:before {
	 content: "\f234";
  	 font-family: 'FontAwesome';
  	 margin-right: 3px;
}
/* Twoje podanie zostało odrzucone */
.webMessage_red {
    background-color: #ed6c63;
}
.webMessage_red:before {
	 content: "\f235";
  	 font-family: 'FontAwesome';
  	 margin-right: 3px;
}
Щелкните Сохранить.
Затем перейдите в: ACP --> Форум --> Шаблоны модерации --> Добавить новый элемент:
В поле «Имя шаблона» введите, например, Проблема решена.
Активен на форумах --> Все
Опции Открыть/Закрыть --> Закрыть
Ответить --> Добавить ответ
Нажмите «Источник документа» и вставьте HTML-код:
<div class="webMessage webMessage_success">
	Problem został rozwiązany.
</div>
Нажимаем кнопку Сохранить.
Перейдите в выбранную тему и нажмите «Модерировать». В списке выберите «Проблема решена».
После нажатия "Проблема решена" тема будет закрыта и будет добавлена наша информационная табличка.
Пример HTML-кода:
<div class="webMessage webMessage_success">
	Problem został rozwiązany.
</div>
<div class="webMessage webMessage_closed">
	Temat został zamknięty.
</div>
<div class="webMessage webMessage_move">
	Temat został przeniesiony.
</div>
<div class="webMessage webMessage_red">
	Twoje podanie zostało odrzucone.
</div>
<div class="webMessage webMessage_ok">
	Twoje podanie zostało przyjęte.
</div>
Предварительный просмотр:
Добавлю только, что нужно выбрать «Может публиковать HTML?» Да.
Credit to CzareK
-
Steam Login Method
Steam Login Method Application for Invision Community that allow users to sign into your forum through the steam open id authentication system. Existing users can link their steam accounts in the members control panel.
Aplikacja pod IPS Community Suite która dodaje nową metodę logowania przy użyciu portalu Steam. Aplikacja została poprawiona pod IPS 4.6 i PHP 7.4.
About Steam Login Method
Author: Adam Lavin
Plugin Version: 3.0.0 (30000)
Last Updated: September 28, 2021
License: The MIT License (MIT)
Compatibility: 4.5, 4.6
GitHub: LavaToaster/IPS-SteamLoginMethod
Tested on IPS: 4.6.10 (Fixed)Приложение Steam Login Method для сообщества Invision, которое позволяет пользователям входить на ваш форум через систему аутентификации Steam с открытым идентификатором. Существующие пользователи могут связать свои учетные записи Steam в панели управления участниками.
Приложение для IPS Community Suite, которое теперь использует метод входа в систему для использования портала Steam. Приложение для проверки подлинности для IPS 4.6 и PHP 7.4.
О способе входа в Steam
Автор: Адам Лавин
Версия плагина: 3.0.0 (30000)
Последнее обновление: 28 сентября 2021 г.
Лицензия: Лицензия MIT (MIT)
Совместимость: 4.5, 4.6
GitHub: LavaToaster/IPS-SteamLoginMethod
Протестировано на IPS: 4.6.10 (исправлено)
-
Добавил
-
Добавлено04/25/23
-
Категория
-
ЯзыкENGLISH
-
-
-
-
5 минут назад, aLEX49566 сказал:
ryancoolround где есть спрос, там есть и предложение) . Сейчас на играх можно не плохо так заработать) Я вот жалею, что не в сша живу, а так , тоже бы на рашке наживался))
Сделайте доброе дело, отдайте / разыграйте лицензию раде данного ресурса. Сделайте конкурс с админом и разыграйте. Думаю это было бы куда полезнее для всех, в наше время)
how do I do it?
-
-
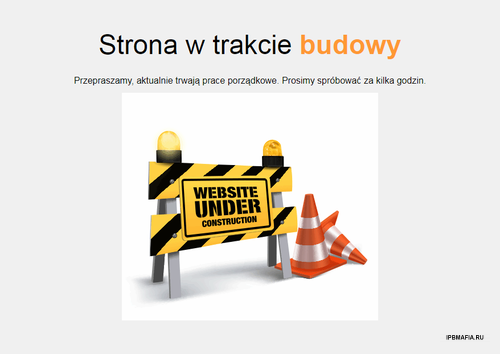
Simple and clear HTML template - Website under construction. Create an index.html file and paste the code below or download the file and put it in the main directory.
HTML code
<html lang="pl-PL">
<head>
<meta name="viewport" content="width=device-width">
<title>Strona w trakcie budowy</title>
<meta http-equiv="Content-Type" content="text/html; charset=utf-8">
<meta http-equiv="Content-Language" content="pl-PL">
<meta name="robots" content="noindex, nofollow">
<meta http-equiv="cache-control" content="no-cache">
<meta http-equiv="pragma" content="no-cache">
<style type="text/css">
html { font-size: 100%; }
body { background-color: #F1F1F1; font-size: 0.8em; margin: 0; font-family:Arial; padding: 3% 0 0 0; }
div.wrapper { margin: 0 auto; padding: 0; max-width: 736px; text-align: center; }
div.wrapper h1{font-size: 3.7em; font-weight:400;}
div.wrapper p{font-size: 16px; line-height: 10px;}
img { max-width:100%; width:auto;}
</style>
</head>
<body>
<div class="wrapper">
<h1>Strona w trakcie <span style="color: #ff9932; font-weight:bold;">budowy</span></h1>
<p>
Przepraszamy, aktualnie trwają prace porządkowe. Prosimy spróbować za kilka godzin.
</p>
<img alt="Under Construction" src="https://i.imgur.com/yq8Bu2f.png">
</div>
</body>
</html>
Download the HTML file
Click on the attachment to download the finished file. The file should be uploaded to the main directory of your website (public_html).Preview:
Простой и понятный HTML-шаблон - Сайт в разработке. Создайте файл index.html и вставьте приведенный ниже код или загрузите файл и поместите его в основной каталог.
HTML-код
<html lang="pl-PL">
<head>
<meta name="viewport" content="width=device-width">
<title>Strona w trakcie budowy</title>
<meta http-equiv="Content-Type" content="text/html; charset=utf-8">
<meta http-equiv="Content-Language" content="pl-PL">
<meta name="robots" content="noindex, nofollow">
<meta http-equiv="cache-control" content="no-cache">
<meta http-equiv="pragma" content="no-cache">
<style type="text/css">
html { font-size: 100%; }
body { background-color: #F1F1F1; font-size: 0.8em; margin: 0; font-family:Arial; padding: 3% 0 0 0; }
div.wrapper { margin: 0 auto; padding: 0; max-width: 736px; text-align: center; }
div.wrapper h1{font-size: 3.7em; font-weight:400;}
div.wrapper p{font-size: 16px; line-height: 10px;}
img { max-width:100%; width:auto;}
</style>
</head>
<body>
<div class="wrapper">
<h1>Strona w trakcie <span style="color: #ff9932; font-weight:bold;">budowy</span></h1>
<p>
Przepraszamy, aktualnie trwają prace porządkowe. Prosimy spróbować za kilka godzin.
</p>
<img alt="Under Construction" src="https://i.imgur.com/yq8Bu2f.png">
</div>
</body>
</html>
Загрузите HTML-файл
Нажмите на вложение, чтобы загрузить готовый файл. Файл необходимо загрузить в основной каталог вашего сайта (public_html).Предварительный просмотр:
Credit to SeNioR
-
Hello 😉 In this topic I will try to post simple and cool scripts written in HTML, CSS and JS available at codepen.io
1. Checking information on the VISA card
A very nice job that, after entering the data, transfers them to the "3D" card, which can be rotated by hovering over it. Everything is done dynamically, depending on which field we click, the card will rotate ;D.
https://codepen.io/supah/pen/OMdPpW/
2. Scoreboard
Leaderboard of the best or most active players. After hovering over the user, the bar moves forward.
https://codepen.io/supah/pen/WwrJpw
3. Backlit keyboard
A very nice script that can be used, for example, when presenting a keyboard or added to a website, e.g. in the login panel ;D. Depending on which key we press, we will see an inscription expressing perhaps "Emotions".
https://codepen.io/kowlor/pen/MYOKRd
4. Account creation (Interactive Sign Up Form)
The dynamic process of creating a new account is well done ;). After entering the email, the field disappears and another one appears. At the final stage of registration, it will show us that the account is ready
https://codepen.io/rkpasia/pen/LNEQod
5. Login (Calm breeze login screen)
Login interface with inputs and a welcome message after logging in. This can be used if, for example, we are creating a "browser game".
https://codepen.io/Lewitje/pen/BNNJjo
6. Rotating orbits
I don't know where it can be used, but someone did a very nice thing. On the left side we have a panel in which we set the speed of the orbits, size etc... Really after a long time something beautiful is created <3.
https://codepen.io/jackrugile/pen/aCzHs
7. Interface
Useful interface to create pages such as facebook. The basis for creating "social pages" is already 😜
https://codepen.io/jlalovi/pen/bIyAr
8. Login panel (Flat login form 3.0)
Nicely done login/account registration panel ;). At first glance, we see the login panel, but if we click on the pencil where it says "click me", registration will appear. When you want to go back to logging back, click the pencil icon.
https://codepen.io/andytran/pen/PwoQgO
9. Simple Video Player
A simple yet nice video player. We can run it in "Fullscreen" mode and adjust the volume.
https://codepen.io/heff/pen/wtrHL
10. Login Panel (Login Box Concept)
Simple nice login panel. After entering the login, it will show us if it is correct, the same with the password. Then it will go to the checking process. If everything is "OK" we will be shown a greeting.
https://codepen.io/jcoulterdesign/pen/azepmX
11. Budget Checker (Login Box Concept)
Surely you've been looking for a slider where you can mark how much budget you want to spend. This is where the "budget slider" comes in 3D. Use the mouse to move the cursor left and right.
https://codepen.io/Hornebom/pen/ranmi
12. Menu (Simple radial menu)
After clicking on the button with 3 dashes, a selection menu will pop up around us. Smooth drop down menu effect.
https://codepen.io/suez/pen/vAais
13. CD Rom 360
The CD rotates 360 degrees. Many people have been looking for how to do this and I have been looking for it myself. You can substitute any element instead of the plate and voilla.
https://codepen.io/stix/pen/dMXbJb
14. PIN check
Nicely done checking the correctness of the pin entered by us. When entering, we fill up with dots, when we enter the whole thing, we will see if the pin is correct. If it is correct it will light up green and if wrong it will light up red. A nice addition when we want to request a password in some document; p.
https://codepen.io/kotwgarnku/pen/PZLgvb
15. Guarded zone
Securing access to the website. On page load js effect. Nicely done form binding. After entering the password, we can click the "PROCEED" button (e.g. OK)
https://codepen.io/THEORLAN2/pen/mPVzWr
16. File download
When we click the arrow button, a white circle will be created that extends out of the page. It means how much percent is left to download the file. It decreases with decreasing % until the end. At the end, you will see a sign that the file has been downloaded. Very cool idea and I think it will come in handy ;D.
https://codepen.io/montechristos/pen/GZgXWN
Всем привет 😉 В этой теме я постараюсь выкладывать простые и крутые скрипты написанные на HTML, CSS и JS доступные на codepen.io
1. Проверка информации по карте VISA
Очень приятная работа, которая после ввода данных переносит их на "3D" карточку, которую можно вращать, наведя на нее курсор. Все делается динамически, в зависимости от того, какое поле мы нажмем, карточка будет вращаться ;D.
https://codepen.io/supah/pen/OMdPpW/
2. Табло
Таблица лидеров лучших или самых активных игроков. После наведения на пользователя полоса движется вперед.
https://codepen.io/supah/pen/WwrJpw
3. Клавиатура с подсветкой
Очень хороший скрипт, который можно использовать, например, при представлении клавиатуры или добавить на веб-сайт, например. в панели входа ;D. В зависимости от того, какую клавишу мы нажмем, мы увидим надпись, выражающую, возможно, «Эмоции».
https://codepen.io/kowlor/pen/MYOKRd
4. Создание учетной записи (интерактивная форма регистрации)
Динамический процесс создания новой учетной записи выполнен хорошо ;). После ввода почты поле исчезает и появляется другое. На финальном этапе регистрации нам покажет, что аккаунт готов
https://codepen.io/rkpasia/pen/LNEQod
5. Войти (Экран входа в систему с легким бризом)
Интерфейс входа с входами и приветственным сообщением после входа в систему. Это можно использовать, если, например, мы создаем «браузерную игру».
https://codepen.io/Lewitje/pen/BNNJjo
6. Вращающиеся орбиты
Я не знаю, где это можно использовать, но кто-то сделал очень хорошую вещь. С левой стороны у нас есть панель, в которой мы устанавливаем скорость орбит, размер и т. д. Действительно, спустя долгое время создается что-то красивое <3.
https://codepen.io/jackrugile/pen/aCzHs
7. Интерфейс
Полезный интерфейс для создания страниц, таких как facebook. Основа для создания "социальных страниц" уже есть 😜
https://codepen.io/jlalovi/pen/bIyAr
8. Панель входа (плоская форма входа 3.0)
Красиво сделанная панель входа/регистрации аккаунта ;). На первый взгляд мы видим панель входа в систему, но если мы нажмем на карандаш, где написано «щелкни меня», появится регистрация. Если вы хотите вернуться к входу в систему, щелкните значок карандаша.
https://codepen.io/andytran/pen/PwoQgO
9. Простой видеоплеер
Простой, но приятный видеоплеер. Мы можем запустить его в «полноэкранном» режиме и настроить громкость.
https://codepen.io/heff/pen/wtrHL
10. Панель входа в систему (концепция окна входа)
Простая приятная панель входа. После ввода логина он покажет нам, правильный ли он, то же самое и с паролем. Затем он перейдет к процессу проверки. Если все "ОК" нам будет показано приветствие.
https://codepen.io/jcoulterdesign/pen/azepmX
11. Проверка бюджета (концепция окна входа)
Наверняка вы искали ползунок, где можно отметить, сколько бюджета вы хотите потратить. Вот тут-то и появляется «бегунок бюджета» в 3D. Используйте мышь для перемещения курсора влево и вправо.
https://codepen.io/Hornebom/pen/ranmi
12. Меню (простое круговое меню)
После нажатия на кнопку с 3 черточками, вокруг нас выскочит меню выбора. Плавный эффект выпадающего меню.
https://codepen.io/suez/pen/vAais
13. Компакт-диск 360
CD вращается на 360 градусов. Многие люди искали, как это сделать, и я искал это сам. Вместо пластины можно заменить любой элемент и вуаля.
https://codepen.io/stix/pen/dMXbJb
14. Проверка PIN-кода
Красиво сделана проверка корректности введенного нами пин-кода. При вводе заполняем точками, при вводе целиком - посмотрим, правильный ли пин. Если он правильный, он загорится зеленым, а если неправильный, загорится красным. Приятное дополнение, когда мы хотим запросить пароль в каком-то документе; п.
https://codepen.io/kotwgarnku/pen/PZLgvb
15. Охраняемая зона
Защита доступа к сайту. JS-эффект при загрузке страницы. Красиво оформленный переплёт. После ввода пароля мы можем нажать кнопку «ПРОДОЛЖИТЬ» (например, ОК)
https://codepen.io/THEORLAN2/pen/mPVzWr
16. Загрузка файла
Когда мы нажмем кнопку со стрелкой, будет создан белый круг, выходящий за пределы страницы. Это означает, сколько процентов осталось для загрузки файла. Он уменьшается с уменьшением % до конца. В конце вы увидите знак того, что файл был загружен. Очень классная идея и думаю пригодится ;D.
https://codepen.io/montechristos/pen/GZgXWN
Кредит для XwReK // Credit to XwReK
-
-
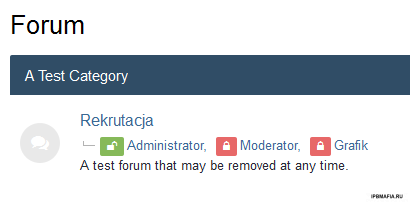
Hello. In this guide, I will write how to add padlock icons in subforums, i.e. recruitment status ON (open) / OFF (closed) in the Invision Community script.
Let's start. To begin with, we go to:
ACP --> Appearance --> Styles and Templates --> Edit HTML and CSS --> CSS tab --> custom --> custom.css
Paste the code below:
.ipsDataItem_subList > li > a:before {
  	font-family: 'FontAwesome';
	display: inline-block;
	-webkit-font-smoothing: antialiased;
	-moz-osx-font-smoothing: grayscale;
  	margin-right: 3px;
  	opacity: 0.8;
  	line-height: 1;
    border-radius: 2px;
    color: #fff;
    font-size: 11px;
    padding: 4px 7px;
}
/* Administrator (Rekrutacja otwarta) */
[data-forumid="2"] .ipsDataItem_subList > li:nth-child(1) a:before {
	content: "\f09c";
   	background-color: #68a72f;
}
/* Moderator (Rekrutacja zamknięta) */
[data-forumid="2"] .ipsDataItem_subList > li:nth-child(2) a:before {
	content: "\f023";
   	background-color: #e14242;
}
/* Grafik (Rekrutacja zamknięta) */
[data-forumid="2"] .ipsDataItem_subList > li:nth-child(3) a:before {
	content: "\f023";
   	background-color: #e14242;
}
Click Save.
Attention. In the code, change the Department ID to your own.
Change in the above code "2" to your ID.[data-forumid="ID"]
How do I know what ID a department has?
The department ID is visible in the URL of the forum. We enter the forum and in the URL we check what ID it has.https://XXXX.pl/forum/ID-XXXx-dzialu/
The final effect:
Russian
Привет. В этом гайде я напишу, как добавить значки висячих замков в подфорумы, т.е. статус рекрутинга ВКЛ (открыт)/ВЫКЛ (закрыт) в скрипте Invision Community.
Давайте начнем. Для начала идем к:
ACP --> Внешний вид --> Стили и шаблоны --> Редактировать HTML и CSS --> вкладка CSS --> пользовательский --> custom.css
Вставьте код ниже:
.ipsDataItem_subList > li > a:before {
  	font-family: 'FontAwesome';
	display: inline-block;
	-webkit-font-smoothing: antialiased;
	-moz-osx-font-smoothing: grayscale;
  	margin-right: 3px;
  	opacity: 0.8;
  	line-height: 1;
    border-radius: 2px;
    color: #fff;
    font-size: 11px;
    padding: 4px 7px;
}
/* Administrator (Rekrutacja otwarta) */
[data-forumid="2"] .ipsDataItem_subList > li:nth-child(1) a:before {
	content: "\f09c";
   	background-color: #68a72f;
}
/* Moderator (Rekrutacja zamknięta) */
[data-forumid="2"] .ipsDataItem_subList > li:nth-child(2) a:before {
	content: "\f023";
   	background-color: #e14242;
}
/* Grafik (Rekrutacja zamknięta) */
[data-forumid="2"] .ipsDataItem_subList > li:nth-child(3) a:before {
	content: "\f023";
   	background-color: #e14242;
}
Щелкните Сохранить.
Внимание. В коде измените ID отдела на свой.
Измените указанный выше код «2» на свой ID.[данные-форумид = "ID"]
Как узнать, какой ID у отдела?
Идентификатор отдела отображается в URL-адресе форума. Заходим на форум и в URL проверяем, какой у него ID.https://XXXX.pl/forum/ID-XXXx-dzialu/
Конечный эффект:
Credit to CzareK
-
-
-
This tutorial will show you a verification badge for staff. Let's begin.
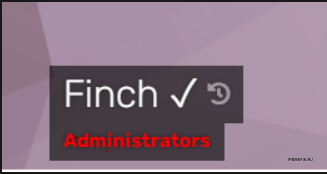
In order to make it:
1) Go to /applications/core/modules/front/members/profile.php in your file manager.
2) Add the code under:public function execute() { /* Load Member */ $this->member = \IPS\Member::load( \IPS\Request::i()->id );if ($this->member->inGroup(4,6)) { $this->member->name = $this->member->name . " ?"; }Basically, this code is checking if the visited profile's group is 4 or 6 (For me, 4 = Administrator, 6 = Moderators) and if it's, it's adding a verification symbol next to username.
Hope that worked.Russian
В этом руководстве вы увидите значок проверки для сотрудников. Давай начнем.
Чтобы сделать это:
1) Перейдите в /applications/core/modules/front/members/profile.php в вашем файловом менеджере.
2) Добавьте код под:
public function execute()
{
/* Load Member */
$this->member = \IPS\Member::load( \IPS\Request::i()->id );
if ($this->member->inGroup(4,6)) { $this->member->name = $this->member->name . " ?"; }По сути, этот код проверяет, является ли группа посещаемого профиля 4 или 6 (для меня 4 = администратор, 6 = модераторы), и если это так, он добавляет символ подтверждения рядом с именем пользователя.
Надеюсь, это сработало.
Credit to Yondu
- Xontero, BlackShot and ryancoolround
-
 2
2
-
 1
1


Добавлено больше категорий в загрузку
in Книга жалоб и предложений
@Respected